Ableton Live's Groove Pool
This week I'd like to discuss one of the features of Ableton which few of my students use or utilize, the Groovepool. Groovepool is a very powerful feature which allows the user to essentially copy the groove, feel and swing of any clip and apply it to another clip. This can be used on both rhythmic/elements or melodic elements and can come from either a midi clip or audio clip. Additionally there are several "stock" grooves which come with Ableton and its many associated producer packs. Live comes with a large selection of grooves, which appear as .agr files in the browser.
GroovesThe easiest way to work with library grooves is to drag and drop them from the browser directly onto clips in your Set. This immediately applies the timing characteristics of the groove file to the clip. If you want to quickly try out a variety of grooves, you can enable the Hot-Swap button above a clip’s Clip Groove chooser and then step through the grooves in the browser while the clip plays. These "grooves" can bring life and feeling to otherwise stock drum and rhythm patterns and can also be used to change the feel and timing of some of your favorite grooves without changing the sound of instrument/clip. Becuase grooves work on audio clips by adjusting the clip’s warping behavior they will only work on Warp enabled audio clips. Groove Pool
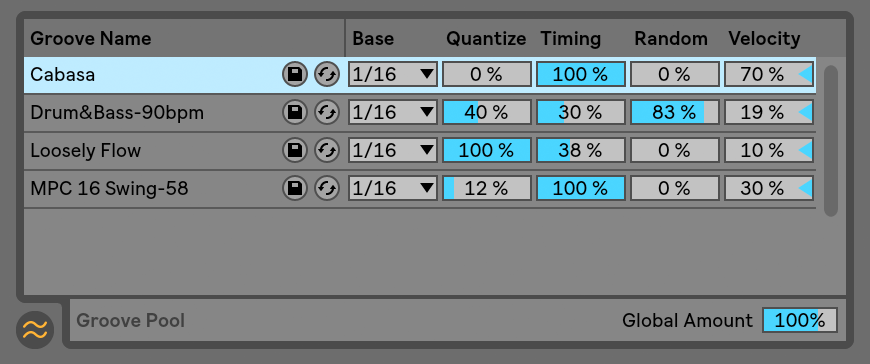
Once you’ve applied a groove file, you can modify its behavior by adjusting its parameters in the Groove Pool, which can be opened or closed via its selector button at the bottom of Browser (looks like a round button with two parallel sets of "waves")
Grooves in the Groove Pool appear in a list, and offer a variety of parameters that can be modified in real time to adjust the behavior of any clips that are using them. You can also save and hot-swap grooves via the buttons next to the Groove’s name.
Base — Base determines the timing resolution/subdivision against which the notes in the groove will be measured. A 1/4 Base, for example, means that the positions of the notes in the groove file are compared to the nearest quarter note, and all notes in any clips that are assigned to that groove will be moved towards the positions of the groove notes. At a base of 1/8th, the groove’s notes are measured from their nearest eighth note. Notes in the groove that fall exactly on the grid aren’t moved at all, so the corresponding notes in your clips will also not be moved.
Quantize — adjusts the amount of “straight“ quantization that is applied before the groove is applied. At 100%, the notes in your clips will be snapped to the nearest note values, as selected in the Base chooser. At 0%, the notes in clips will not be moved from their original positions before the groove is applied.
Timing — adjusts how much the groove pattern will affect any clips which are using it.
Random — adjusts how much random timing fluctuation will be applied to clips using the selected groove. At low levels, this can be useful for adding subtle “humanization“ to highly quantized, electronic loops. Note that Random applies differing randomization to every voice in your clip, so notes that originally occurred together will now be randomly offset both from the grid and from each other.
Velocity — adjusts how much the velocity of the notes in clips will be affected by the velocity information stored in the groove file. Note that this slider goes from -100 to +100. At negative values, the effect of the groove’s velocity will be reversed; loud notes will play quietly and vice versa.
Global Amount — this parameter scales the overall intensity of Timing, Random and Velocity for all of the available groove files. At 100%, the parameters will be applied at their assigned values. Note that the Amount slider goes up to 130%, which allows for even more exaggerated groove effects. If grooves are applied to clips in your Set, the Global Amount slider will also appear in Live’s Control Bar.
Pressing the Commit button below the Clip Groove chooser “writes“ your groove parameters to the clip. For MIDI clips, this moves the notes accordingly. For audio clips, this creates Warp Markers at the appropriate positions in the clip.
The timing and volume information from any audio or MIDI clip can be extracted to create a new groove. You can do this by dragging the clip to the Groove Pool or via the Extract Groove command in the clip’s right-click(PC) / CTRL-click(Mac) context menu.
I encourage you to experiment with the groove pool. The possibilities are endless! Try extracting the groove from a tambourine or shaker to apply to a strummed guitar pattern or to a hi hat. Or duplicate the same parts and apply grooves to only one to subtly create variations in the timing and expressiveness. This can be used for creating string ensembles or creatively doubled drum sounds.
Try out Ableton Live's Groove Pool. Until next time!
-Written By Greg Gonzales


There are 1 comments
Groovy
I've never even realized this feature exists.. I'll give it a shot! Thanks!
ReplyAdd comments or questions